ASRock 4CoreN73PV-HD720p R3.0 driver and firmware
Drivers and firmware downloads for this ASRock item


Related ASRock 4CoreN73PV-HD720p R3.0 Manual Pages
Download the free PDF manual for ASRock 4CoreN73PV-HD720p R3.0 and other ASRock manuals at ManualOwl.com
User Manual - Page 3
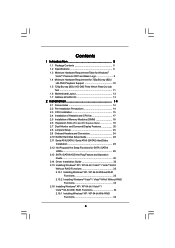
...SATAII Hard Disk Setup Guide 28 2.11 Serial ATA (SATA) / Serial ATAII (SATAII) Hard Disks
Installation 29 2.12 Hot Plug and Hot Swap Functions for SATA / SATAII
HDDs 29 2.13 SATA / SATAII HDD Hot Plug Feature and Operation
Guide 30 2.14 Driver Installation Guide 32 2.15 Installing Windows® XP / XP 64-bit / VistaTM / VistaTM 64-bit
Without RAID Functions 32 2.15.1 Installing Windows®...
User Manual - Page 4

... Floppy Configuration 47 3.3.7 Super IO Configuration 47 3.3.8 USB Configuration 49 3.4 Hardware Health Event Monitoring Screen 49 3.5 Boot Screen 50 3.5.1 Boot Settings Configuration 51 3.6 Security Screen 51 3.7 Exit Screen 52
4 Software Support 53
4.1 Install Operating System 53 4.2 Support CD Information 53
4.2.1 Running Support CD 53 4.2.2 Drivers Menu 53 4.2.3 Utilities Menu...
User Manual - Page 5

...
ASRock 4CoreN73PV-HD720p Motherboard (Micro ATX Form Factor: 9.6-in x 8.0-in, 24.4 cm x 20.3 cm)
ASRock 4CoreN73PV-HD720p Quick Installation Guide ASRock 4CoreN73PV-HD720p Support CD One 80-conductor Ultra ATA 66/100/133 IDE Ribbon Cable One Ribbon Cable for a 3.5-in Floppy Drive One Serial ATA (SATA) Data Cable (Optional) One Serial ATA (SATA) HDD Power Cable (Optional) One ASRock 6CH DVI...
User Manual - Page 7
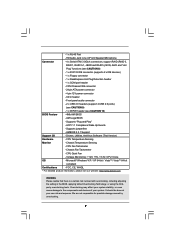
...12V power connector
- CD in header
- Front panel audio connector
- 2 x USB 2.0 headers (support 4 USB 2.0 ports)
(see CAUTION 9)
- 1 x WiFi/E header (see CAUTION 10)
BIOS Feature
- 4Mb AMI BIOS
- AMI Legal BIOS
- Supports "Plug and Play"
- ACPI 1.1 Compliance Wake Up Events
- Supports jumperfree
- AMBIOS 2.3.1 Support
Support CD
- Drivers, Utilities, AntiVirus Software (Trial Version...
User Manual - Page 21

... to page 19
for proper expansion card installation procedures for details. 2. Connect the DVI-D monitor cable to the VGA/DVI-D port on the I/O panel of this
motherboard. Connect the D-Sub monitor cable to the VGA/D-Sub port on the I/O panel of this motherboard. 3. Boot your system. Press to enter BIOS setup. Enter "Share Memory" option to adjust the memory capability to [32MB], [64MB], [128MB] or...
User Manual - Page 28

... Hard Disk Setup Guide
Before installing SATAII hard disk to your computer, please carefully read below SATAII hard disk setup guide. Some default setting of SATAII hard disks may not be at SATAII mode, which operate with the best performance. In order to enable SATAII function, please follow the below instruction with different vendors to correctly adjust your SATAII hard disk to SATAII...
User Manual - Page 32

...-bit on your SATA / SATAII HDDs without RAID functions, please follow below steps.
Using SATA / SATAII HDDs with NCQ and Hot Plug functions
STEP 1: Set Up BIOS.
A.
Enter BIOS SETUP UTILITY Advanced screen
IDE Configuration.
B.
Set the "SATA Operation Mode" option to [AHCI].
STEP 2: Make a SATA / SATAII driver diskette.
A.
Insert the ASRock Support CD into your optical drive to boot your...
User Manual - Page 33

...to the OS you install. The
drivers are as below:
A. NVIDIA nForce Storage Controller (required) Windows XP B. NVIDIA nForce Storage Controller (required) Windows XP64
Please select A for Windows® XP in AHCI mode. Please select B for Windows® XP 64-bit in AHCI mode.
Using SATA / SATAII HDDs without NCQ and Hot Plug functions
STEP 1: Set Up BIOS.
A.
Enter BIOS SETUP UTILITY Advanced...
User Manual - Page 34

...
STEP 1: Set Up BIOS.
A.
Enter BIOS SETUP UTILITY Advanced screen
IDE Configuration.
B.
Set the "SATA Operation Mode" option to [non-RAID].
STEP 2: Install Windows® VistaTM / VistaTM 64-bit OS on your system.
Insert the Windows® VistaTM / Windows® VistaTM 64-bit optical disk into the optical drive
to boot your system, and follow the instruction to install Windows®...
User Manual - Page 35

... Windows RAID installation guide part of the docu ment in the following path in the Support CD: .. \ RAID Installation Guide
2.16.2 Installing Windows® VistaTM / VistaTM 64-bit With
RAID Functions
If you want to install Windows® VistaTM / Windows® VistaTM 64-bit on your SATA /
SATAII HDDs with RAID functions, please follow below steps.
STEP 1: Set Up BIOS.
A.
Enter BIOS SETUP...
User Manual - Page 37

... the system time/date information
Advanced To set up the advanced BIOS features
H/W Monitor To display current hardware status
Boot
To set up the default system device to locate and load the
Operating System
Security
To set up the security features
Exit
To exit the current screen or the BIOS SETUP UTILITY
Use < > key or < > key to choose among...
User Manual - Page 40

..., such as Microsoft® Windows® XP. Set to [Enabled] if using Microsoft® Windows® XP, or Linux kernel version 2.4.18 or higher. This option will be hidden if the installed CPU does not support Hyper-Threading technology.
Intel (R) SpeedStep(tm) tech. Intel (R) SpeedStep(tm) tech. is Intel's new power saving technology. Processor can switch between multiple frequency...
User Manual - Page 53

...-ROM drive. The CD automatically displays the Main Menu if "AUTORUN" is enabled in your computer. If the Main Menu did not appear automatically, locate and double click on the file "ASSETUP.EXE" from the BIN folder in the Support CD to display the menus. 4.2.2 Drivers Menu The Drivers Menu shows the available devices drivers if the system detects installed devices. Please install...
User Manual - Page 54

... you install the VGA driver (version 163.91) on your system, but the window is not in full screen mode, please follow below steps to adjust the window. 1. Right-click the desktop and select NVIDIA Control Panel. 2. Click Display and click Change Flat Panel Scaling. 3. In the option When using a resolution lower than my display's native
resolution, please select Use my display's built...
Quick Installation Guide - Page 4
...: 9.6-in x 8.0-in, 24.4 cm x 20.3 cm)
ASRock 4CoreN73PV-HD720p Quick Installation Guide ASRock 4CoreN73PV-HD720p Support CD One 80-conductor Ultra ATA 66/100/133 IDE Ribbon Cable One Ribbon Cable for a 3.5-in Floppy Drive One Serial ATA (SATA) Data Cable (Optional) One Serial ATA (SATA) HDD Power Cable (Optional) One ASRock 6CH DVI I/O Panel Shield
4 ASRock 4CoreN73PV-HD720p Motherboard
English
Quick Installation Guide - Page 6

...12V power connector
- CD in header
- Front panel audio connector
- 2 x USB 2.0 headers (support 4 USB 2.0 ports)
(see CAUTION 9)
- 1 x WiFi/E header (see CAUTION 10)
BIOS Feature
- 4Mb AMI BIOS
- AMI Legal BIOS
- Supports "Plug and Play"
- ACPI 1.1 Compliance Wake Up Events
- Supports jumperfree
- AMBIOS 2.3.1 Support
Support CD
- Drivers, Utilities, AntiVirus Software (Trial Version...
Quick Installation Guide - Page 17

... to page 15
for proper expansion card installation procedures for details. 2. Connect the DVI-D monitor cable to the VGA/DVI-D port on the I/O panel of this
motherboard. Connect the D-Sub monitor cable to the VGA/D-Sub port on the I/O panel of this motherboard. 3. Boot your system. Press to enter BIOS setup. Enter "Share Memory" option to adjust the memory capability to [32MB], [64MB], [128MB] or...
Quick Installation Guide - Page 24

..., for changing various ATA features. Please visit HITACHI's website for details: http://www.hitachigst.com/hdd/support/download.htm
The above examples are just for your reference. For different SATAII hard disk products of different vendors, the jumper pin setting methods may not be the same. Please visit the vendors' website for the updates.
24 ASRock 4CoreN73PV-HD720p Motherboard
English
Quick Installation Guide - Page 26

...-bit on your SATA / SATAII HDDs without RAID functions, please follow below steps.
Using SATA / SATAII HDDs with NCQ and Hot Plug functions
STEP 1: Set Up BIOS.
A.
Enter BIOS SETUP UTILITY Advanced screen
IDE Configuration.
B.
Set the "SATA Operation Mode" option to [AHCI].
STEP 2: Make a SATA / SATAII driver diskette.
A.
Insert the ASRock Support CD into your optical drive to boot your...
Quick Installation Guide - Page 27

...to the OS you install. The
drivers are as below:
A. NVIDIA nForce Storage Controller (required) Windows XP B. NVIDIA nForce Storage Controller (required) Windows XP64
Please select A for Windows® XP in AHCI mode. Please select B for Windows® XP 64-bit in AHCI mode.
Using SATA / SATAII HDDs without NCQ and Hot Plug functions
STEP 1: Set Up BIOS.
A.
Enter BIOS SETUP UTILITY Advanced...